Short answer: I tested an AI living room redesign before after workflow using a real room photo, and the result was useful for direction-setting rather than as a literal shopping list. The AI quickly found a stronger layout, a calmer color palette, and better lighting ideas, but it also made a few unrealistic assumptions about window size, furniture scale, and what could be changed without construction.
If you are curious whether AI can help you rethink a living room, the best use case is not blindly copying the final image. It is using the transformation as a visual brief: what mood works, what pieces should stay, what looks too staged, and what you can actually do this weekend.
Key takeaways
- AI is strongest at mood, palette, furniture direction, and making a familiar room feel fresh.
- The best before-and-after results come from a clear, well-lit photo taken from one corner of the room.
- AI can exaggerate room size, alter windows, or invent built-ins, so every idea needs a reality check.
- Use the after image as an inspiration board, then translate it into practical changes: layout, rug size, lighting, wall color, and storage.
- You can try the AI studio with your own living room photo and compare several styles before buying anything.
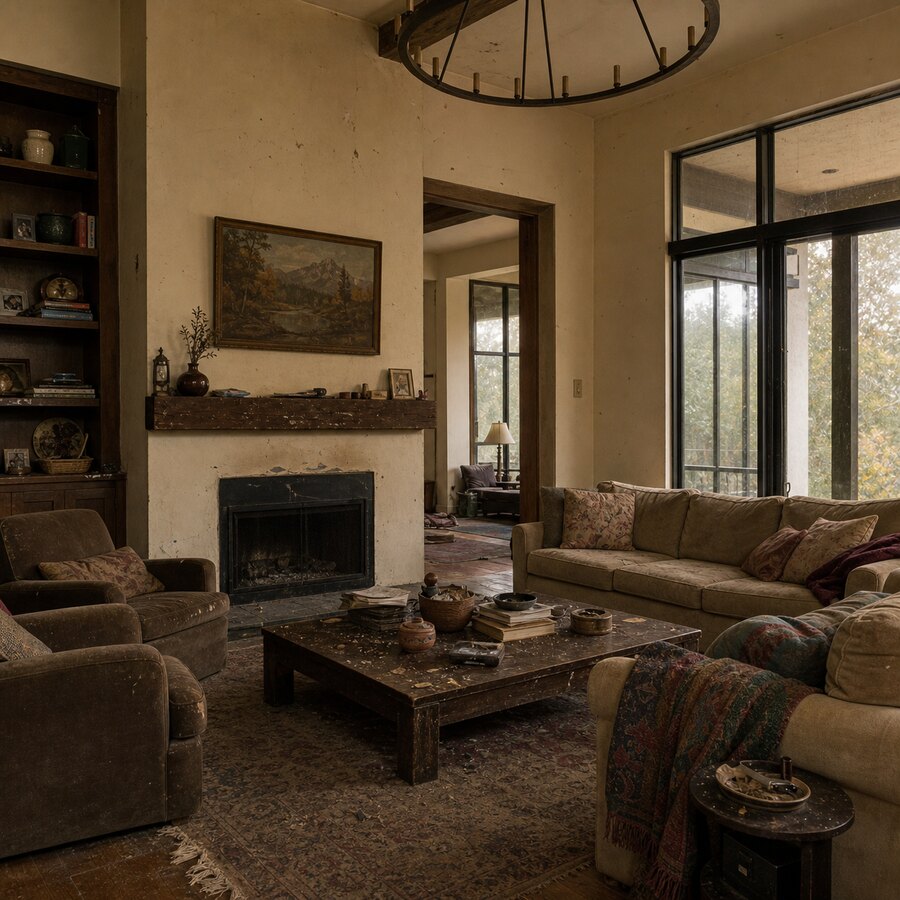
The living room I started with
The starting room was not terrible. That is important. Most real homes are ordinary spaces with a few decisions that no longer quite work together. The room had a sofa, a coffee table, neutral walls, and enough natural light to make the photo readable. It also had the usual problems: the seating felt a little flat, the wall area was underused, and the room lacked a strong focal point.
That is why this kind of test is useful. Most of us know when a room feels unfinished, but we cannot always tell whether the fix is a new rug, warmer lamps, a different sofa placement, art above the couch, or simply removing clutter.
For this test, I wanted a practical answer to a simple question: if I let AI redesign my living room, would the before and after result show ideas I could actually use, or would it create a fantasy render that only looks good online?
What I asked the AI to change
I kept the request realistic. Instead of asking for a mansion-style makeover, I asked for a warmer, cleaner living room that still felt livable. The goal was not to erase the room completely. The goal was to see whether AI could suggest a better version of the same basic space.
The most useful prompts were specific but not overcontrolled. A good instruction sounds like: keep the room as a living room, preserve the main architecture, improve the layout, add warmer lighting, make the space feel modern and comfortable, and avoid impossible structural changes. That gives the AI direction without forcing it into a narrow checklist.
If you want to test your own room, start with one style at a time. Try “warm modern,” “organic minimalist,” “cozy Scandinavian,” or “transitional with natural textures.” You will learn more from four distinct concepts than from one perfect-sounding prompt.
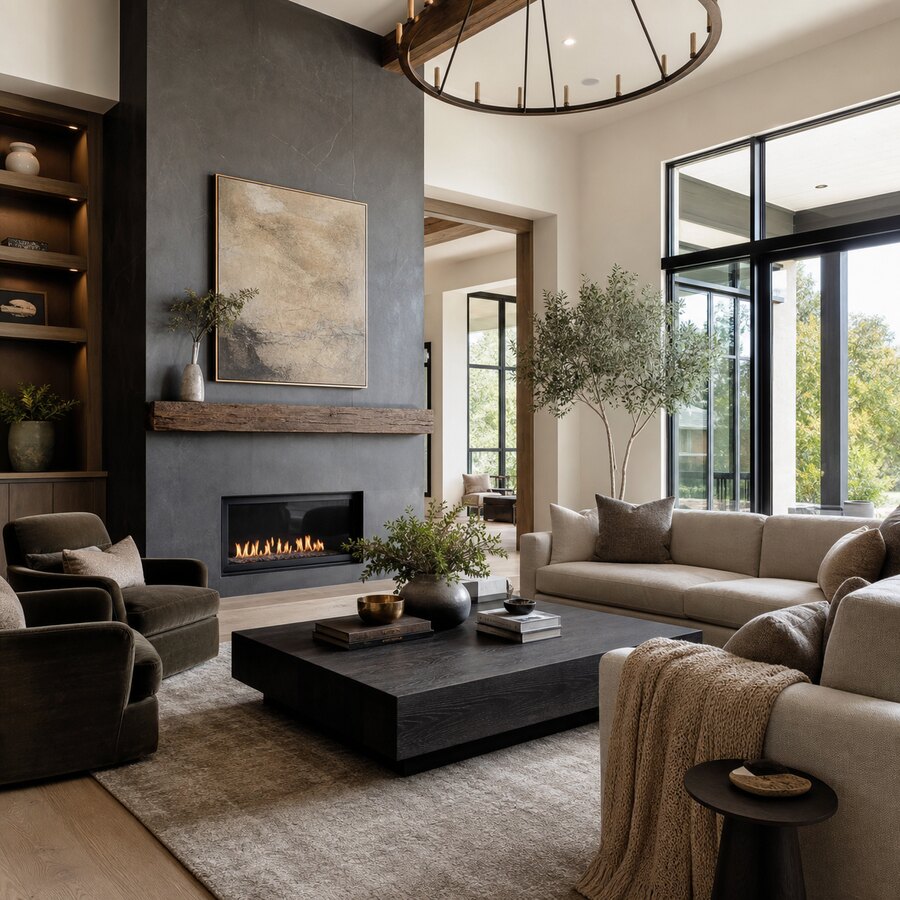
The before-and-after result
The after image was immediately more appealing. The room felt more intentional. The AI gave the living area a clearer mood, softened the color palette, and made the furniture feel more connected. Instead of separate objects sitting in a room, the after version looked like a designed space.
The biggest improvement was balance. In the original photo, the room looked functional but not especially composed. In the AI version, the seating area had more visual weight, the rug helped define the conversation zone, and the lighting made the space feel warmer. The wall treatment also gave the eye somewhere to land, which is one of the most common missing pieces in real living rooms.
This is where an ai living room redesign before after comparison becomes more than a novelty. Seeing both images side by side makes the weak points easier to name. You may not copy the AI version exactly, but you can suddenly see that the room wants a larger rug, layered lamps, wall art, shelving, or more texture.
What worked surprisingly well
1. The AI found a stronger style direction
The before room had no obvious design language. The after result introduced one: a warmer, calmer living room with more natural materials and less visual noise. Many rooms fail not because individual pieces are bad, but because the room is trying to be three styles at once.
Once that direction is visible, practical decisions get easier. You can choose a rug, lamp, pillows, and wall art that support the same idea instead of buying random pieces one at a time.
2. The lighting ideas were useful
Living rooms often depend too much on overhead light. The AI version suggested a softer mix of ambient and accent lighting, one of the easiest ways to make a room feel more finished without replacing everything.
The exact fixtures in the after image may not be the ones to buy, but the principle was right: the room needed layers of light, not just brighter light.
3. The palette became calmer
The AI reduced contrast in the wrong places and added warmth where the room felt plain. That does not mean every living room should become beige. It means the colors should feel intentional, so the sofa, rug, curtains, art, and accessories stop competing for attention.
For more room-specific inspiration, the before and after examples are helpful because they show how different spaces respond to different palettes. A living room can handle more texture and layering than a small bathroom, while a bedroom often benefits from quieter contrast.
What felt unrealistic
1. The AI slightly exaggerated the space
This is the most common issue with AI room redesign tools. The after image may make the room feel wider, taller, or brighter than it really is. That does not make the result useless, but it does mean you should not treat it like a measured floor plan.
Before making purchases, measure the room. Measure the sofa, rug area, wall width, walkway clearances, and the distance from seating to TV or fireplace. AI can inspire the layout, but tape measure decisions still belong to you.
2. Some architectural changes were too easy
The after version hinted at upgrades that may require more work than the image suggests. Built-ins, wall paneling, enlarged windows, hidden wiring, and flush storage can look effortless in a render. In real life, they involve budget, tools, contractors, and decisions.
A useful trick is to divide AI suggestions into three buckets: easy, moderate, and structural. Easy changes include lamps, pillows, art, plants, curtains, and rearranging furniture. Moderate changes include repainting, replacing a rug, changing a coffee table, or mounting shelves. Structural changes include altering windows, adding built-ins, moving electrical, or changing flooring.
3. The shopping details were not reliable
The AI showed the kind of furniture that would work, but not exact products. Treat the output as a reference image, not a catalog. Look for the sofa shape, rug scale, wood finish, lamp height, and overall color relationship.
If you want to move from inspiration to purchase, create a short shopping brief from the image. For example: large neutral textured rug, slim black floor lamp, round wood coffee table, two warm accent pillows, oversized art with muted colors. That list is far more useful than trying to identify a fictional chair from a generated image.
How to try an AI living room redesign yourself
The process is simple, but the quality of your input photo matters. Stand in a corner or doorway so the camera captures as much of the room as possible. Use natural daylight if you can. Clear obvious clutter, but do not overstage the room.
Then upload the image to an AI room redesign tool and choose a style. On RoomRenovation.ai, you can try the AI studio and generate living room concepts from your own photo. Start with one realistic direction, then test a second style outside your comfort zone.
After you get results, do not ask, “Which image is prettiest?” Ask better questions:
- What changed the mood of the room the most?
- Which furniture pieces could I keep?
- Which changes are inexpensive and reversible?
- What looks attractive but unrealistic?
- What can I do first without committing to a full renovation?
You can also browse related inspiration, such as AI bedroom redesign before and after ideas or small living room AI design ideas, to compare how different room types respond to the same design logic.
Final verdict: is AI useful for living room before-and-after planning?
Yes, with realistic expectations. AI is very useful for seeing your room with fresh eyes, testing styles quickly, and turning vague design frustration into concrete ideas. It is less reliable for exact dimensions, construction feasibility, or product sourcing.
The best way to use an AI living room redesign before after result is as a decision-making tool. Let it show you what is possible, then translate the image into real-world steps: measure, prioritize, budget, and start with reversible changes. If the after image makes you understand your own room better, the tool has done its job.
FAQ
Can AI redesign my living room from one photo?
Yes. A single clear photo is usually enough for AI to create a visual redesign concept. For best results, use a wide photo taken in daylight from a corner or doorway so the tool can see the room layout, furniture, walls, flooring, and windows.
Are AI living room before-and-after images accurate?
They are directionally useful, but not perfectly accurate. AI may change scale, lighting, windows, or furniture dimensions. Use the image for ideas and style direction, then verify measurements and practical constraints before buying or renovating.
What should I look for in an AI living room redesign?
Look for patterns rather than exact products. Pay attention to layout, rug size, color palette, lighting layers, wall treatment, furniture shapes, and storage ideas. Those clues are easier to apply than trying to copy every object in the generated image.
How do I make the AI result more realistic?
Use prompts that preserve the room’s architecture and ask for realistic furniture, practical lighting, and no structural changes. Avoid asking for overly luxurious or impossible transformations unless you are only collecting fantasy inspiration.
Should I buy furniture directly from an AI redesign image?
No. Treat the image as a visual brief, not a shopping list. Convert the result into categories, measurements, materials, and colors, then shop for real products that fit your room and budget.